While Microsoft Word offers various features to enhance productivity and collaboration, it’s crucial to consider the security of your documents. Understanding and configuring the right security settings can help protect sensitive information, prevent unauthorized access, and minimize potential risks. In this blog, we will delve into the essential security settings in Microsoft Word and explore how they can safeguard your valuable documents.
How to Secure Your Microsoft Word Docs
Password Protection
The first line of defense for securing your Word documents is password protection. By setting a password, you can restrict access to the document, ensuring only authorized users can open and edit it. To apply password protection:
Step 1:
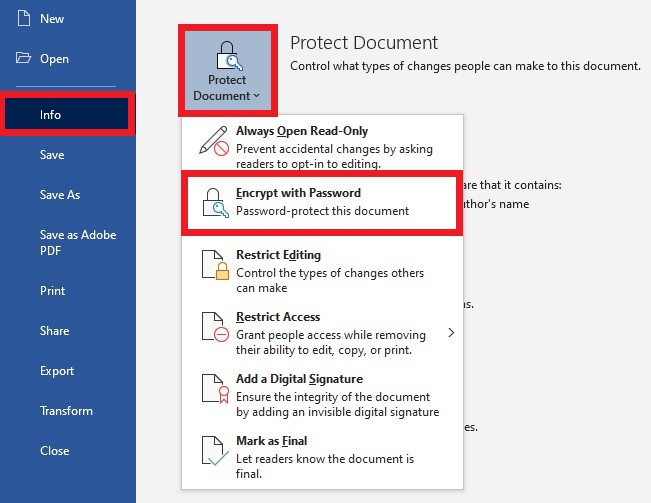
Click on File in the top-left corner of the Word window, then select Info.
Step 2:
Select Protect Document and then Encrypt with Password.
Step 3:
Enter your desired password and click OK to confirm.
Remember to use a strong, unique password with a combination of uppercase and lowercase letters, numbers, and symbols. Also, avoid using easily guessable information like names or birthdays.
Related | 7 Password Security Best Practices | Aldridge
Restrict Editing
Word allows you to control the level of access other users have to your document. You can restrict editing permissions, granting specific individuals or groups the ability to make changes while limiting others to read-only access. To apply restricted editing:
Step 1:
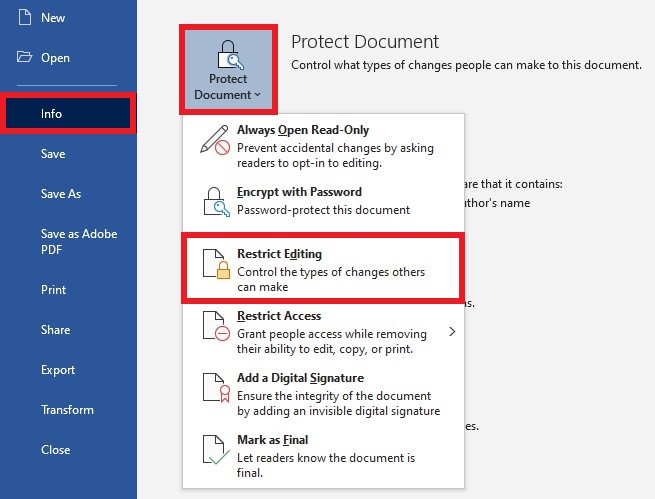
Go to File then Info. Select Protect Document and choose Restrict Editing.
Step 2:
In the Restrict Editing pane, you can set permissions by adding individuals or specifying a group with edit access.
Digital Signatures
Digital signatures offer an added layer of authenticity and integrity to your Word documents. By digitally signing a document, you certify that it has not been tampered with and that you are the genuine author or editor. To add a digital signature:
Step 1:
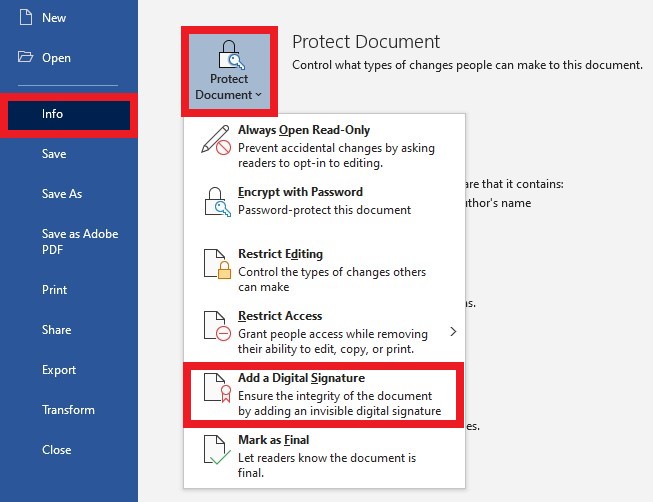
Click on File then Info. Select Protect Document and choose Add a Digital Signature.
Step 2:
Follow the prompts to create and apply your digital signature.
Document Inspector
Before sharing a document, it’s essential to remove any hidden or personal information that could compromise security. The Document Inspector feature allows you to scan your document for sensitive data and remove it before distribution. To access the Document Inspector:
Step 1:
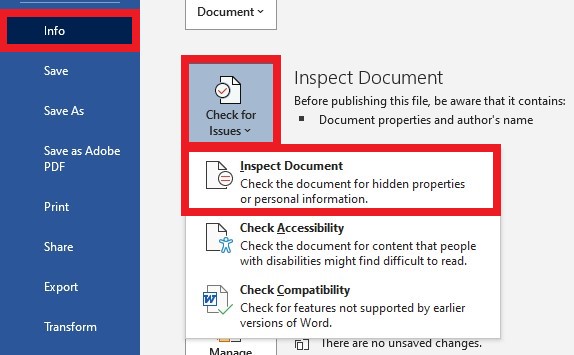
Click on File then Info. Select Inspect Document and select Inspect.
Step 2:
Review the results and choose which information you want to remove.
This process helps avoid unintentionally sharing confidential data, such as comments, revision history, or hidden text.
Trusted Locations
Microsoft Word utilizes trusted locations to determine the safety of opening files. By specifying trusted locations, you can ensure that only documents from reliable sources or network locations are allowed to open without additional security warnings. To set up trusted locations:
Step 1:
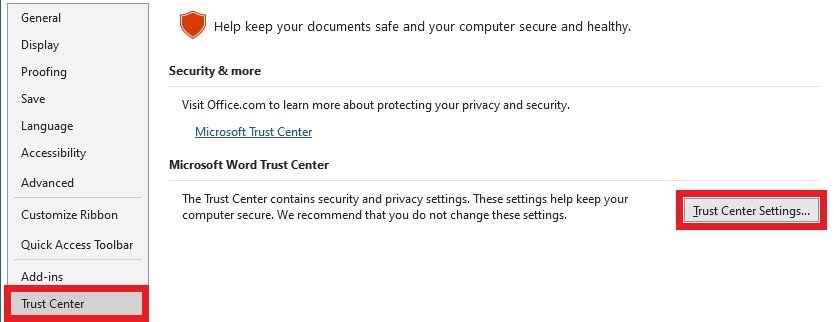
Click on File, then Options, and select Trust Center.
Step 2:
Click on Trust Center Settings, then Trusted Locations.
Step 3:
Add folders that you trust, such as your local network or SharePoint locations.
Macro Security
Macros are small pieces of code that automate tasks in Word documents. While they can be beneficial, they can also be exploited by malicious actors to spread malware. Microsoft Word provides macro security settings to control macro execution. To adjust macro security:
Step 1:
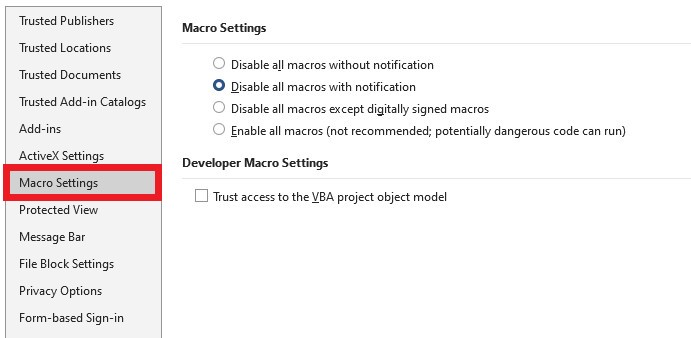
Click on File, then Options, and select Trust Center.
Step 2:
Click on Trust Center Settings, then Macro Settings.
Step 3:
Choose the desired level of macro security based on your needs.
It’s generally recommended to set macro security to Disable all macros with notification or Disable all macros except digitally signed macros to minimize potential risks.
By understanding and configuring the security settings in Microsoft Word, you can significantly enhance the protection of your documents. Remember to stay vigilant and regularly update your security settings to stay ahead of potential threats.
More on Microsoft 365
Visit our Microsoft 365 Insights & Resources page to see more Microsoft tips & tricks! Whether you’re considering getting Microsoft 365 and trying to figure out which tier makes sense for you, or if you already have Microsoft but want to get more value from your M365 tools and services, there is something for you.


