


Multi-Factor Authentication (MFA) protects against unauthorized, potentially malicious people from accessing your account. MFA supplements the log-in process by requiring the user to provide at least one second factor – something they have (such as physical access to a trusted work area, or possession of a registered mobile phone), or something that they are (such as a biometric fingerprint) – in addition to the something that they know (a password).
What is Microsoft 365 Multi-Factor Authentication (MFA)?
Microsoft 365 MFA is a security feature that you can implement to prevent unauthorized access to Microsoft accounts (email, SharePoint, Teams Voice, etc.). Basic MFA is included with all Microsoft 365/Office 365 subscriptions, but it is an all-or-nothing experience on a per-user basis. When enabled for a user account, MFA prompts for each authentication for that user.
Organizations that are subscribed to higher-tier versions of Microsoft 365, like Business Premium, have access to a more sophisticated version of Microsoft MFA. Advanced MFA utilizes conditions to more finely tune how MFA is applied across your organizations. For example, you can say that you you’ll only challenge logins coming from your office every 90 days, but log-ins coming from remote locations must be challenged every 30 days.
Related 3 Benefits of Microsoft 365 Business Premium
Advanced MFA isn’t just about convenience, it also allows you to apply stricter MFA policies to high-risk behaviors. If someone is logging in from a new or unusual location, you can challenge them with an MFA prompt every time they try to login. Advanced MFA gives you more control over the balance between convenience and security.
How to set up the Microsoft Authenticator mobile app
- Once you’re enrolled, you’ll notice that applications like Office, Outlook, or Office/Outlook on the web will prompt you to sign-in
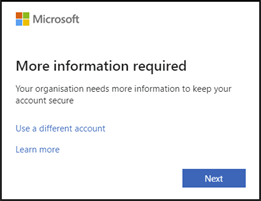
- Once you sign-in, you’ll see a new window, stating More Information Required / Additional Step Required – hit Next when prompted
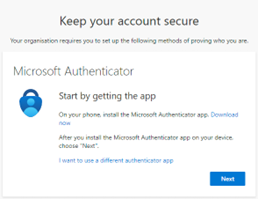
3. Before proceeding further, please navigate to your mobile phone app store, and search for Microsoft Authenticator. Install it, then open it in readiness for the next steps, and hit Next when ready
4. In the Microsoft Authenticator application on your phone, choose Add an Account and select Work or School Account
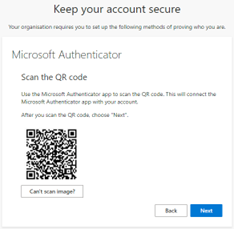
5. Still in the phone application, allow the application to access your camera temporarily if prompted, and aim it at the QR code shown on screen
6. The authenticator app will immediately recognize the code and activate it. Once that process is completed, you can hit Next within the Keep your account secure window on your computer
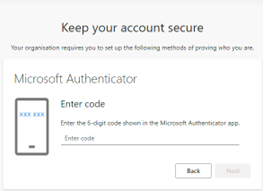
7. Microsoft will then prompt you to enter a code. In your Microsoft Authenticator app on your phone, locate the account you just added, and click into it. You’ll see a One-time password code which is 6 digits along with a countdown timer. Simply type the 6-digit code from your phone into the on-screen prompt, and hit Next when ready
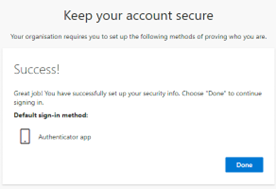
8. Microsoft will then confirm you were successful, and you can hit Done to finish out the process
Working with Microsoft 365 Multifactor Authentication
Moving forward, whenever you sign into a Microsoft service via either desktop or mobile application, or web browser, you’ll find an additional step after entering your username and password, where you’ll be prompted to verify your identity using Microsoft 365 MFA.
There are multiple methods Microsoft offers to verify your identity. You may be asked to enter a 6-digit time-based one-time password (TOTP) that can be found in your M365 authenticator app. Or, upon login you may receive a push notification on your mobile device that you can approve to gain access. The specific prompt you receive will depend on your organization’s M365 subscription tier and how your IT team has configured your MFA.
Time-based One-time Password (TOTP) Method
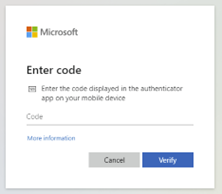
After logging into your M365 account you will be challenged with this prompt:
At this point, open your Microsoft Authenticator app on your phone, click into your account, and take the 6-digit code you’ll find, and enter it into the Microsoft prompt, before hitting Verify
Push Notification Method
After logging into your M365 account, a prompt will appear with a 2-digit number.
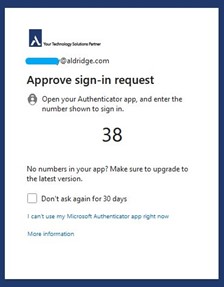
You will also receive a notification on your mobile device that asks you to approve the sign-in and for the 2-digit number from the desktop prompt.
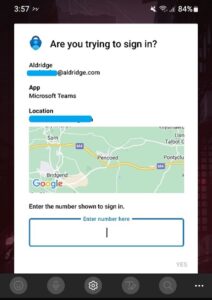
Enter the code, hit approve, and you’re in.
Note: The 2-digit code is an enhanced version of the push notification method. If your organization does not use this enhanced feature, you may only be asked to approve the prompt on your phone – there will be no 2-digit code. It is considered best practice to add the 2-digit code to the push notification prompt, it is a minimal sacrifice of convenience for an additional layer of security.
Microsoft 365 Business Premium comes with an extensive list of security tools and features, but they must be configured properly before they offer any real protection. If you aren’t on Business Premium yet, you need to be planning to upgrade. If you are already on Business Premium, get with your IT team to make sure that you are fully utilizing the security benefits included with your subscription.